Metadata Configuration
A metadata configuration will need to be generated for each table you'd like to use with Pikaview. These metadata configurations control the data type, formatting, and visibility of each column in the corresponding table. Review the column properties section to see a full list of options.
By default, the Views and scripting needed for managing metadata configurations are contained within the Exchange-PikaviewConfiguration project.
Steps to Generate a New Metadata Configuration
Navigate to Configuration List
- Navigate to
<BASE_URL>/data/perspective/client/Exchange-PikaViewConfigurationto view the current list of Configurations.
 If the metadata tables have not been created, the screen below will appear instead:note
If Pikaview was just recently installed, this page will be completely blank as there are no existing configs.
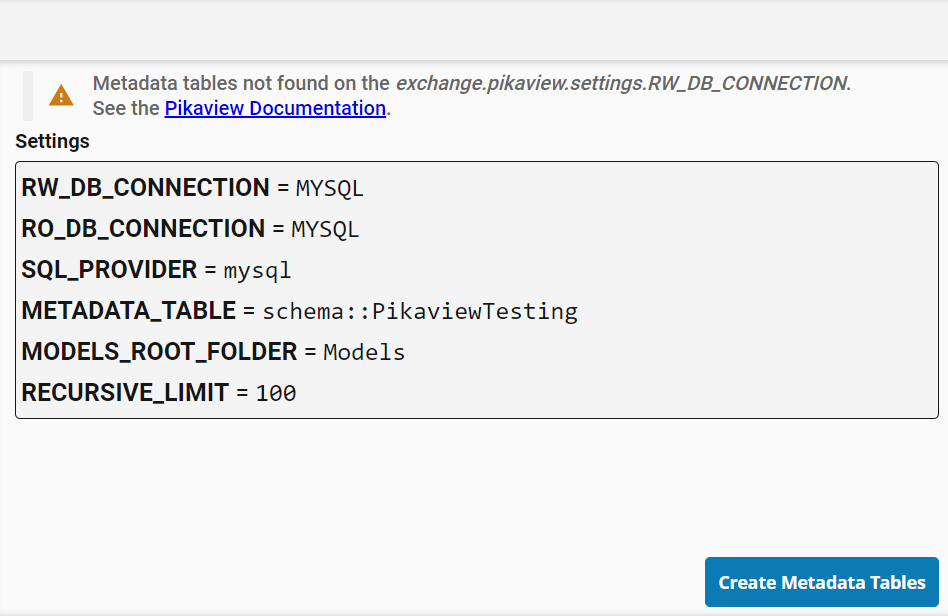 Refer to the initial installation instructions and follow the metadata table creation steps to resolve this issue.
Open Configuration Attributes Form
- Click the "New Configuration" button to open the Configuration Attributes form. Fill out all relevant information and then click "Build Model" to continue to the Configuration Page.
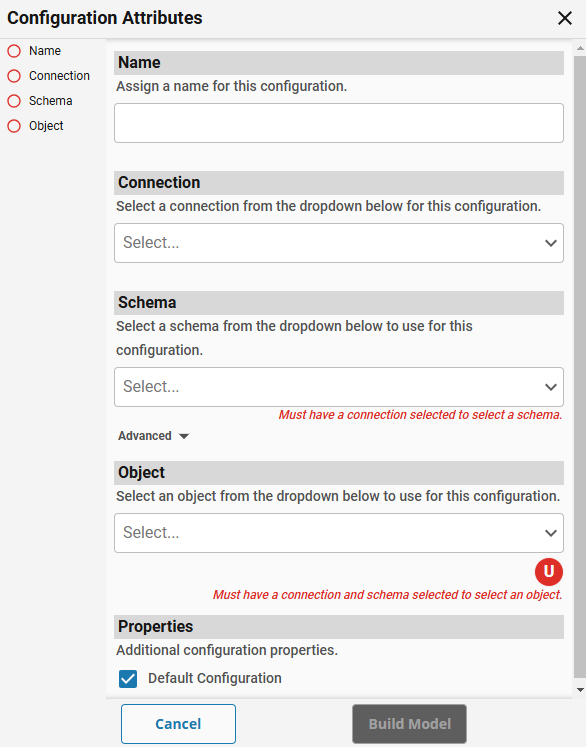 info
infoTo see details on each field of these properties, refer to the Configuration Properties section
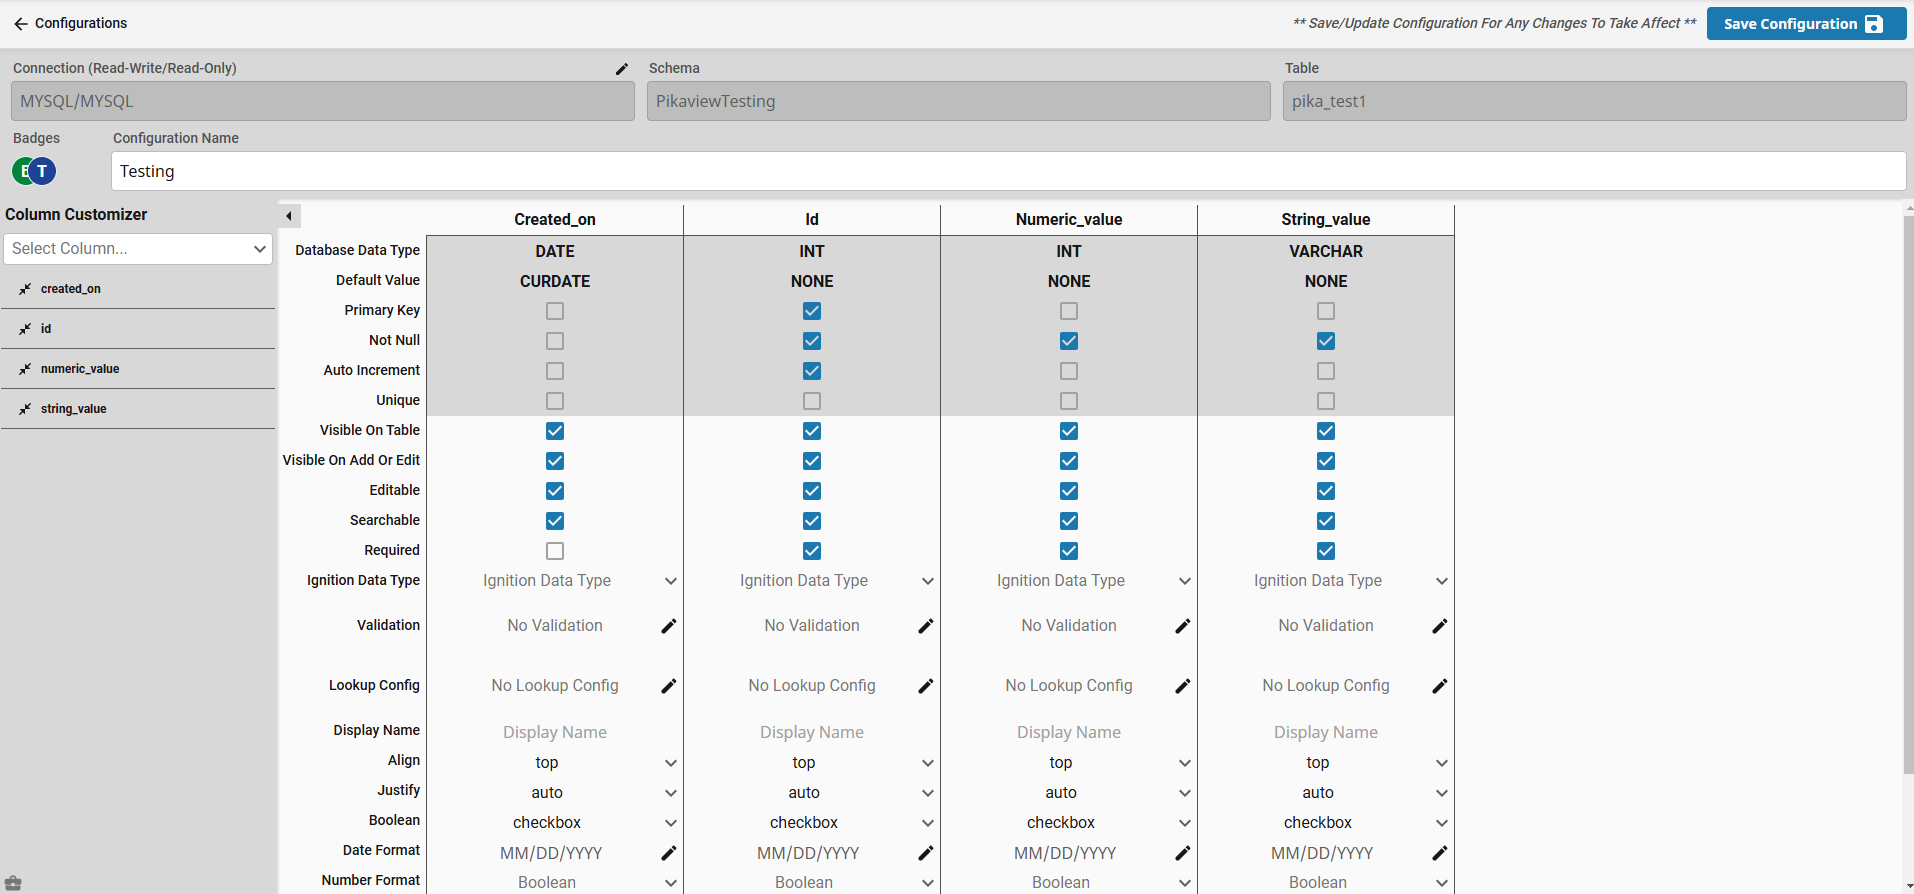
Edit Configuration Page
-
On the Configuration Page, make configuration edits to the individual columns detected in the specified table. See the Column Properties section for more info, or the common actions section for a full list of actions that can be taken on the Configuration Page.
warningIf this configuration is for a View, you will need to manually assign the Primary Key column(s) in order for the configuration to work properly. To learn more, refer to the Column Properties section.
-
Once satisfied, click the "Save Configuration" button to save all changes.
-
Navigation back to the Configuration List page.
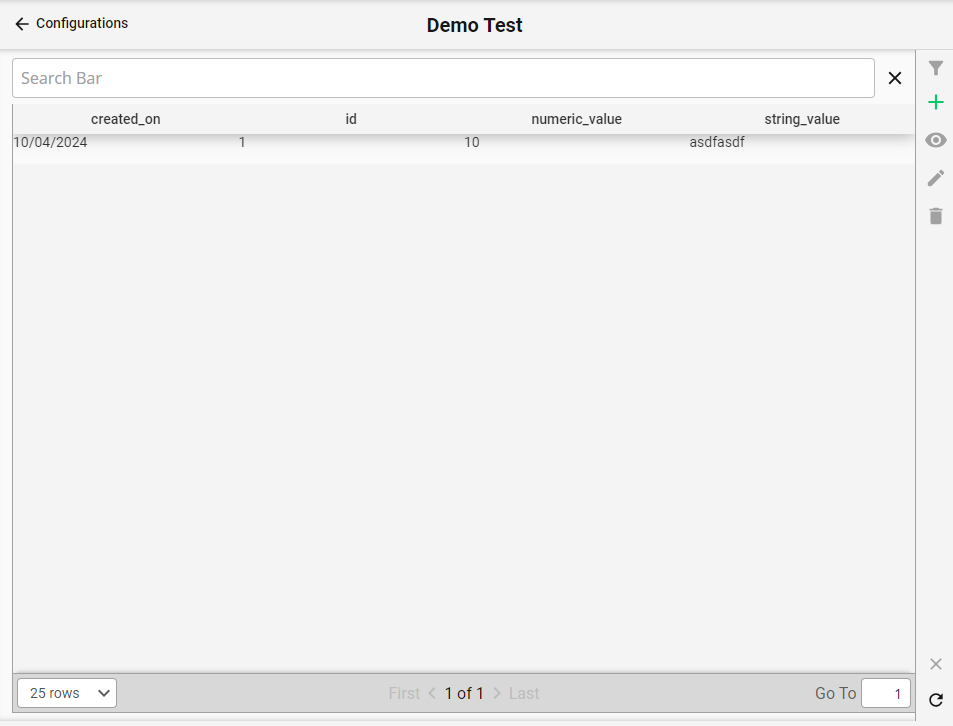
Preview Data
-
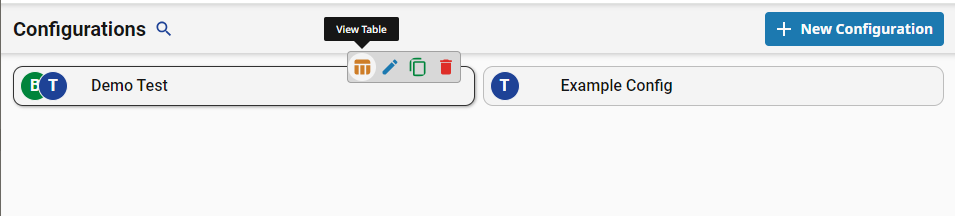
Back on the Configuration List, you should now see an entry for the configuration you just created.
-
Click the View Table icon to preview the data in the table.
This completes the entire process needed to generate a metadata configuration for a single table. If this is the first metadata configured for the table, the configuration will automatically be marked as the default configuration, meaning it will be the default set of metadata used when Pikaview initializes a Service to work with the table data. Additional configurations per table can be generated on top of this initial default one, in case other configuration profiles are desired.
Configurations List
This page shows a list of all configurations detected for the various Views/tables that Pikaview is able to be used with. Each item in the list is composed of a Configuration Card. When highlighted, the Configuration Card gives access to other quick actions like previewing data, editing the configuration, and deleting the configuration.
From this screen you are able to create a new configuration, which needs to be done before Pikaview can access data in a database table. See Steps to Generate a New Metadata Configuration to learn more.
Configuration Card

Badges
| Badge | Symbol | Description |
|---|---|---|
| Base Configuration | B | Indicates that this model is the initial configuration for this object. |
| Table Object | T | Indicates that underlying model object is a SQL table. |
| View Object | V | Indicates that underlying model object is a SQL view. |
View Table
Directs you to a View which contains an instance of the Table Component which will display the data in this table.
Edit Configuration
Directs you to the Configure Page to edit this configuration.
Clone Configuration
Directs you to the Configure Page with a cloned copy configuration of this configuration, which allows you to create a new configuration that is based on the original.
Delete Configuration
Opens a delete confirmation popup which, after confirmation, will permanently delete the configuration.
This action cannot be undone.
Common Actions
Search Configurations
Click the Search icon next to the page title to open a text field for searching configurations by name.
Create New Configuration
Click the New Configuration button in the top right, this will open the Configuration Attributes form popup, which will allow you to begin creating a new configuration.
Refresh Configurations
Click the refresh icon on the bottom right of the page to force the list of configurations to refresh.
Configure Page
This page is used for editing basic Configuration Properties as well as various Column Properties.
Configuration Properties
The schema and object properties are immutable and cannot be changed once the configuration has been created.
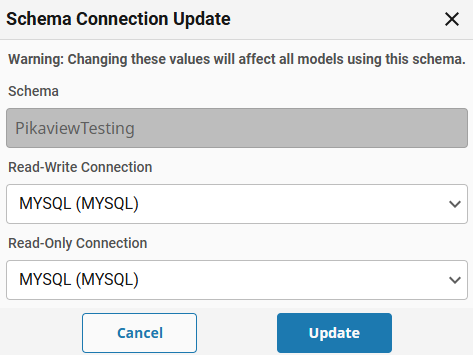
The Read-Only/Read-Write connections settings can be changed after creation, but note that these settings apply to all configurations in the same schema.
To edit these connections settings on an existing configuration, click the pen icon in the top right of the "Connection" field:

The resulting popup can be used to change the connection settings:
| Property | Description |
|---|---|
| Name | Display name for this configuration. |
| Connection | Gateway database connection to use for this model. Note, the user is able to define both a Read-Only and Read-Write connection under Schema > Advanced: 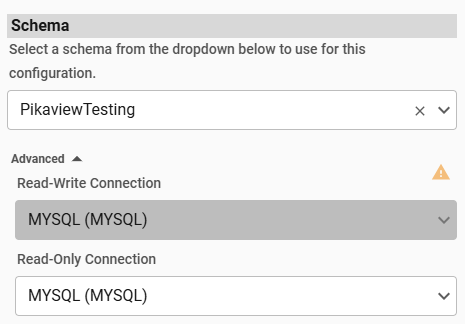 By default, both connection values will be set to the same value. |
| Schema | Database schema from the selected connection to use for this model. |
| Object | Database object (table or view) to use for this model. |
Column Properties
| Property | JSON Key | Description |
|---|---|---|
| Primary Key | primaryKey | For configurations pointed to a table, this will be set automatically based on the detected Primary Key(s) of the table. This field is normally not editable, but for a configuration pointed to a view, this field is editable and must be manually set by the user to function as a unique key for querying purposes. If this is not set on a configuration pointed to a view, then querying a specific row will not be possible. |
| Visible on Table | visible | Determines whether the column is displayed on the table View. |
| Visible On Add Or Edit | visibleEdit | Determines whether the column is displayed on the form popup. |
| Editable | editable | Controls whether the column is editable on the form popup. |
| Searchable | searchable | Controls whether the column is searchable in the search bar or advanced search panel. |
| Required | required | Indicates that the column is required on the form popup. |
| Ignition Data Type | ignDataType | Data type mapping to ignition. |
| Display Name | displayName | Label to display on the table View and form popup. |
| Align | align | Controls how the table row data is aligned for the column. |
| Justify | justify | Controls how the table row data is justified for the column. |
| Boolean | boolean | Determines how to display boolean inputs (only applies to boolean type columns). |
| Date Format | dateFormat | Formatting to apply on date values (only applies to date type columns). |
| Number Format | numberFormat | Formatting to apply on numeric columns (only applies to numeric type columns). |
| Sort | sort | Controls the sort ordering of the table display. |
| Header Align | header.align | Controls the alignment of the header in the table View. |
| Header Justify | header.justify | Controls the justification of the header in the table View. |
| Filterable | filterable | Determines if the column can be filtered. |
| Resizable | resizable | Controls whether the table column is resizable on the table View. |
| Validation | validate | PyDict object for validating column input, refer to Validation properties defined below. |
| Lookup Config | lookupConfig | PyDict object for joining outside tables, refer to Lookup Config properties defined below. |
Validation
| Property | Description |
|---|---|
| mode | Available Modes:
|
| errorMessage | Message displayed when input does not pass validation. |
Lookup Config
| Property | Description |
|---|---|
| schema | SQL schema to use for lookup. |
| tableName | SQL table to use for lookup. |
| keyColumn | Table column to use for the JOIN condition. |
| displayField | Table column to display on the table view or form popup. |
| defaultFilterDict | Controls the values returned in the lookup through a filter. |
| defaultOrderDictList | Controls the order the lookup values are presented. |
Common Actions
Edit Configuration Name
- Click into the Configuration Name text field.
- Edit text to the desired configuration name.
- Click the Update Configuration button in the top right.
Change Column Display (Sort) Order
- Click the toolbox icon in the bottom left of the column customizer.
- Click the checkbox to the right of each column name that needs an order change.
- Click one of the buttons below Column Order to change the sort order of the columns.
Available Actions
- To Top - Move columns to the beginning of the sort order.
- Move Up - Move columns up one position.
- Move Down - Move columns down one position.
- To Bottom - Move columns to the end of the sort order.
- After changing the column(s) sort order re-click the toolbox icon icon to exit the column order mode.
- Click the Update Configuration button in the top right.
Deselect icon to the right of the Column Order label will deselect all of the currently selected columns.
Edit Column Properties
- Click on the column to edit (when not in the column sort order mode).
- The column with it's existing configuration properties will appear to the right of the column selection menu.
- Edit the column's properties.
- Click the Update Configuration button in the top right.